Introduction
Blocks serve as specialized tools tailored to help you create custom functions. These functions offer the flexibility to accept optional inputs and consistently generate desired outputs. Remarkably, Logic Blocks are designed to ensure smooth operations without causing any unintended changes or "side effects" to your system's overall state.
These diverse blocks encompass a range of types, including formulas, validations, validation sets, decision tables, and decision trees. This assortment empowers you to develop reusable functions that can seamlessly enhance your project's capabilities. By incorporating Logic Blocks, you can effectively bridge gaps and optimize workflows, all without the need for manual coding efforts.
Types of Logic Blocks
In FlowOn, logic blocks come in various types, each designed for specific purposes. Let's delve into these types of logic blocks to better understand their individual functionalities and applications.
| Type | Description |
|---|---|
| Formula | Formulas facilitate calculations across data types, handling numbers, dates, text, and boolean conditions. |
| Validation | Designed to assess conditions yielding binary outcomes. Ensures accurate data validation and decision-making. |
| Validation Set | Groups multiple validations for comprehensive input validation. Enhances accuracy by optionally halting at the first error. |
| Decision Table | Navigates complex decision-making with multiple conditions. Automates decision-making for consistent results. |
| Decision Tree | Offers a visual representation of decision-making pathways. Helps navigate decisions based on conditions. |
For a more in-depth understanding of each type, please refer to their respective pages. Your journey to mastering flowOn logic blocks starts there.
Common Properties of Blocks
All the logic block types explained above share certain common properties. These properties include the block's name, description, associated project, input parameters, data parameters, and a designation indicating whether the block is marked as is action. Let's delve into each of these properties in greater detail.
| Property | Required | Description |
|---|---|---|
| Name | Yes | The name of the new block. |
| Type | Yes | The type of the block (formula, validation, validation set, decision table/tree). |
| Project | Yes | The project to which the block belongs. |
| Description | No | The optional description of the block. |
| Is Action | No | Indicates whether the block is marked as an action. |
| Input | No | The input parameters to be used in the block. |
| Data | No | Data that can be added from an entity or queried from a table. |
Special Properties For Decision Tables and Decision Trees:
Decision tables and decision trees share the same properties as other logic block types, and they also have the two specific properties mentioned below.
| Property | Required | Description |
|---|---|---|
| Decisions | Yes | The decisions you create using expressions to add them. At least one decision is required. |
| Outcome | Yes | The outcome you add corresponding to each decision in the decision table/tree. |
Building a Block: A Step By Step Guide
1- Choose Block Type and Define Its Properties
Start by identifying the primary function of your block. Depending on its purpose, select the right category, such as validation, formula, or validation set. Once the type is chosen, configure the block's essential attributes:
- Block Name: Assign a descriptive name.
- Description: Briefly outline its functionality.
- Project Association: Determine which project the block belongs to.
- Return Type: Specify the expected return data format (e.g., integer, boolean, string) if applicable.
- Inputs/Data: Define the data or inputs the block will handle or require.
- Outcome/Decisions: Define the Decisions and outcome of the block when applicable (Decision table/tree)
Step 1: Choose Block Type and Define Its Properties
2- Design the Logic
Utilize built-in functions to define your block's behavior. This step is where you shape the core functionality of your block.
Step 2: Design the Logic
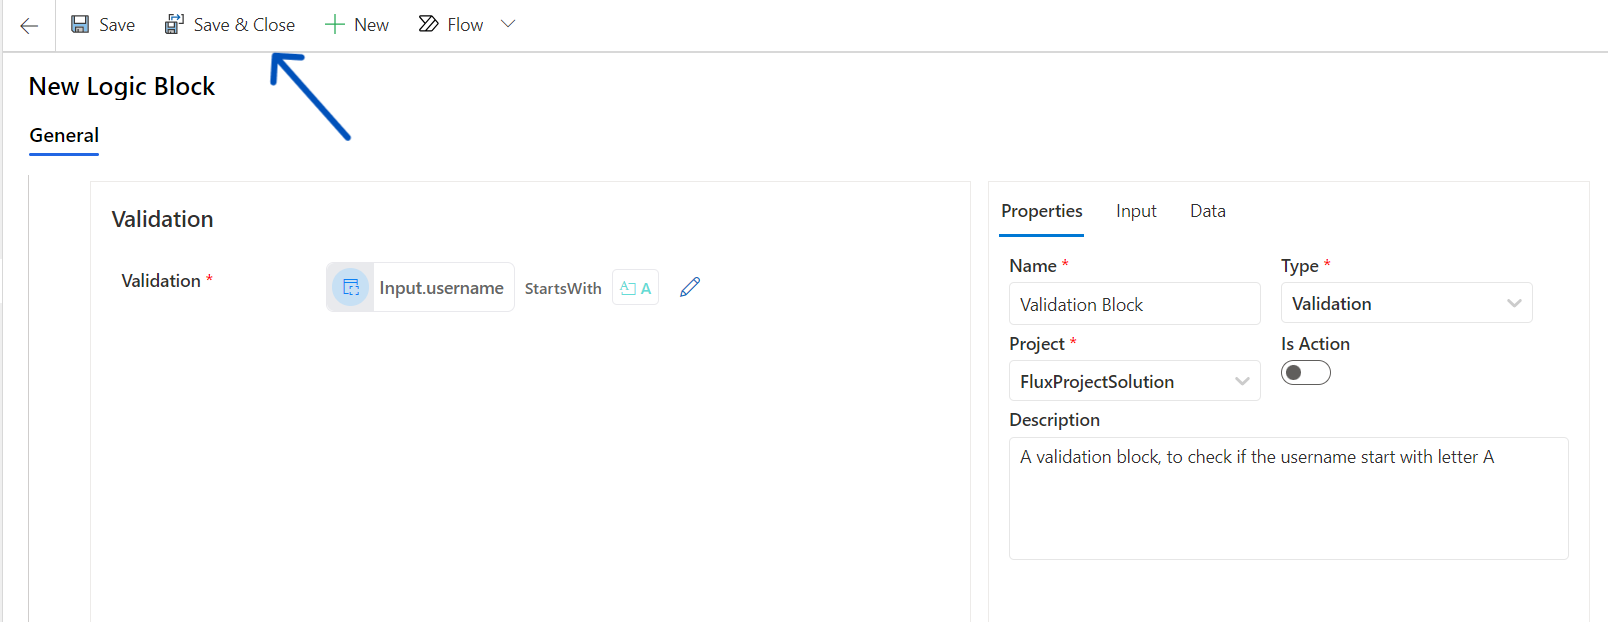
3- Save and Finalize
Once you're satisfied with the block's configuration and logic, save it. Your block is now ready for integration into the Flows!
 Step 3: Save and Finalize the Block
With your block built and ready, the foundation of your project stands strong. Dive into the formula block, confident in the structure you've crafted.
What's Next
Now that we've covered the various types of FlowOn logic blocks, their common properties, it's time to delve deeper into the first type: the Formula Block. In the upcoming section, we will explore the ins and outs of using formula blocks to perform calculations, handle different data types, and create efficient functions.